
How to create a website with Publish: Part 1
What is Publish?
Publish is a static site generator built specifically for Swift developers. It enables entire websites to be built using Swift and supports themes, plugins, and tons of other powerful customization options. Publish uses domain-specific language Plot to build and generate Html documents with Swift. Both products are open source (Publish, Plot) and are created by John Sundell.
Why we would want to use this tool?
- We want to generate only static web pages - pages that are distributed the same to all users.
- We are interested in using a Swift programming language in the design process.
Back to Publish
Publish uses Python's simple HTTP server for development purposes and, in addition to Html pages, also generate RSS feed and site map. By default, Publish generates a website content based on Markdown files placed within that project Content folder, but any number of content items and custom pages can also be added programmatically. Publish can also facilitate the deployment of websites to external servers through its DeploymentMethod API. And is shipped with built-in implementations for Git and GitHub-based deployments.
Lets try to build our website
Ok, this was all for the beginning, now we are going to a creation example. You can start using a shipped theme named Foundation, but the real fun only comes with using your own theme. And quite honestly for real use, you will definitely need your own them.
But first, we need to get our own copy of the Publish. Publish is distributed using the Swift Package Manager. To install it into a project, add it as a dependency within your Package.swift manifest:
let package = Package(
    ...
    dependencies: [
        .package(url: "https://github.com/johnsundell/publish.git", from: "0.1.0")
    ],
    ...
)
Then import Publish wherever you’d like to use it:
import Publish
Publish also ships with a command line tool that makes it easy to set up new website projects, and to generate and deploy existing ones. To install that command line tool, simply run make within a local copy of the Publish repo:
$ git clone https://github.com/JohnSundell/Publish.git
$ cd Publish
$ make
The next step is to create a place for your website generator. Create a new directory, open a new terminal in it or go to it in your current terminal, and run publish new to generate a website project for your website.
$ mkdir /path/to/YourWebsiteDirectoryName
$ cd /path/to/YourWebsiteDirectoryName
$ publish new
Now we have a specific generator for our website. Open it in Xcode:
$ open Package.swift
The website generator is defined as a Swift package, which acts as the configuration as to how the website should be generated and deployed. It contains three directories with the configuration Content, Resources, Sources.
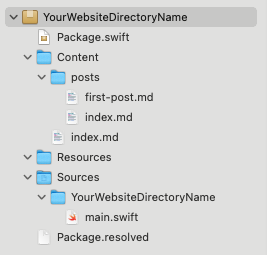
The Content directory contains Markdown files in subdirectories and an index Markdown file. Each subdirectory is related to the website section. It contains its own index file and other files related to pages of the particular section. All files are Markdown files. Here we will create new content for our website.
The Resources directory contains all resources, e.g., CSS files, images.
The Sources directory contains all Swift code, e.g., our custom website theme definition. This directory even contains an important file named main.swift with a basic website configuration and a code to generate your website, as shown in the code below.
Where we define website sections?
The website sections are by default defined within the main.swift file (code is below) as a SectionID enum. This file also contains website metadata and basic definitions of website URL, name, description (this is going to be seen by people searching on Google), language, and a path to an image that represents the website, as shown in the code below.
import Foundation
import Publish
import Plot

// This type acts as the configuration for your website.
struct YourWebsiteDirectoryName: Website {
    enum SectionID: String, WebsiteSectionID {
        // Add the sections that you want your website to contain here:
        case posts
        case yourSection
        case yourAnotherSection
    }

    struct ItemMetadata: WebsiteItemMetadata {
        // Add any site-specific metadata that you want to use here.
    }

    // Update these properties to configure your website:
    var url = URL(string: "https://your-website-url.com")!
    var name = "Your website name"
    var description = "This is going to be seen by people searching on Google."
    var language: Language { .english }
    var imagePath: Path? { "images/logo.png" }
}

// This will generate your website using the shipped theme named Foundation:
try YourWebsiteDirectoryName().publish(withTheme: .foundation)
You are now able to generate all pages. How? Build and run a package for your website in Xcode (CMD + R). After the process is successful, you will find all the generated pages in a new Output directory.
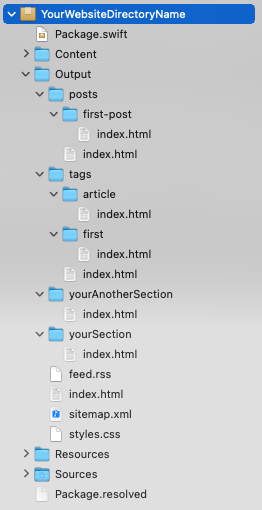
At the same time, you can see your new website in action. How? Upload all the content from the Output directory to your Webhosting or open a terminal in your generator directory and run this:
$ publish run
This command does everything necessary and starts the local web server at http://localhost:8000.
...
[1/6] Copy 'Resources' files
[2/6] Add Markdown files from 'Content' folder
[3/6] Sort items
[4/6] Generate HTML
[5/6] Generate RSS feed
[6/6] Generate site map
✅ Successfully published Your website name
🌍 Starting web server at http://localhost:8000

Press ENTER to stop the server and exit
The next step is to create your own theme and we will describe this in the following article.